This tutorial will explain how to convert an uploaded/downloaded MP4 video clip into an animated image format, known as a GIF (Graphics Interchange Format) using Adobe Photoshop.
The images used in this article are of Photoshop CC 2018, so your screen may look a little different if you’re using a different version of the program for this task.
Resources for downloading free stock videos
These websites have large caches of free stock video clips available to the public. iStock in particular has a wide range of video files, and most of the others have more specialized videos (nature themes, aerial views, etc.)
- iStock – https://www.istockphoto.com/footage?esource=SEM_IS_GO_US_Head_Video_Stock_EN_Exact&kw=US_Free_Exact_free+stock+video_e&kwid=s_43700035620611228_dc&pcrid=284448695277&utm_medium=cpc&utm_source=GOOGLE&utm_campaign=US_Head_Video_Stock_EN_Exact&utm_term=free+stock+video&ds_rl=1261606&ds_rl=1265190&ds_rl=1265190&gclid=EAIaIQobChMIxOjvj9L44QIVERgMCh1OYg5IEAAYASAAEgKsVfD_BwE&gclsrc=aw.ds
- Life of Vids – https://www.lifeofvids.com/
- Pexels – https://www.pexels.com/videos/
- Pixabay –https://pixabay.com/
- Videezy – https://www.videezy.com/
- Videvo – https://www.videvo.net/
Converting your video clip to a GIF-compatible form
- Download the video clip you wish to use, or connect your own external drive containing your video clip
- Without opening the clip, click the Photoshop icon to open the program

-
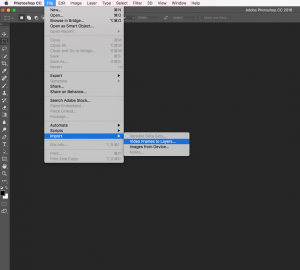
- Click the “File” tab at the top of the window
- From here, scroll down the tab menu to “Import,” and select the “Video Frames to Layers” option
- Select the video file you want to use from the menu and click “Open”
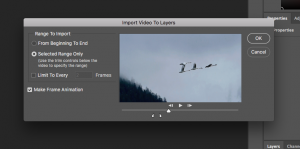
- At the bottom of the popup window that appears on the screen, make sure the box next to “Make Frame Animation” is checked

- This popup window will also allow you to select whether to use the full clip, a selected portion of the clip, or every 2nd/3rd/etc. frame of the clip for your GIF by clicking the bubble next to the option you choose
- To crop the video, simply use the crop tool to do so as you would with a picture (otherwise the gif may auto-crop it)
- When you’re finished, click “OK”
Creating and saving your GIF:
-
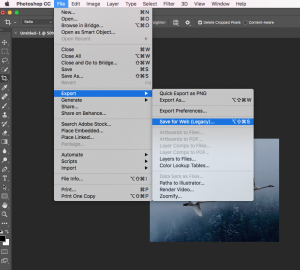
- Click the “File” tab at the top of the window
- Scroll down the tab menu and click “Save For Web”
- This option may also be listed as “Save For Web (Legacy)” depending on the version of Photoshop on the computer. Both serve the same function
- In some versions of Photoshop (like this one), you may have to select the “Export” option in the “File” tab, and then click “Save For Web”
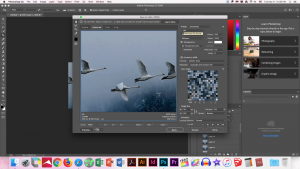
- On the sidebar now visible on the screen, you can select a preset GIF option or use the drop down tab beneath the preset menu and select “GIF,” which will allow you to adjust the options to suit your needs

- Select “Save” at the bottom of the screen to name and save your GIF. Make sure that you save to an external drive or email the file to yourself if you are using a Mount Holyoke computer
Enjoy!


