Final Destination: SpecialOne SurpriseBox

Short Story Featuring SpecialOne

SpecialOne Demo

Project Description

Now that we’re sold on the idea of buying SpecialOne, let’s first learn its basics.

Who am I?

I’m the founder of SpecialOne. SpecialOne is a surprise box expert that elevates your engagement day by curating your glowing and music ring box.

Why is my company relevant to you?

In today’s ultra-competitive world, the only way people can feel good about themselves is by being better than others. It is so easy for people to get lost in the comparison loop. It’s common for people to have second thoughts after seeing their ring and go about thinking – “Jess’s ring looks better than mine! Ugh! Why did John even propose me with this single solitaire ring?” However, this ruins the entire essence of a special moment that can only be experienced by you and no one else.

SpecialOne aims at enhancing the engagement day experience by removing unnecessary pressure on how fancy your ring should be, but instead works on making the moment special.

Who would buy SpecialOne Surprise Box?

The market for SpecialOne Surprise Boxes is huge! According to wedding.report (yes, this website exists!) the total number of weddings in 2020 was 1.2 million in the United States. If we get a 10% of this market share, then we would get roughly 120,000 buyers in the US alone!

Who will mentor me in this project?

I would seek assistance from the course instructor, Professor St. John and Instructor Mensing.

What materials and funding will I require for this project?

I would require:

  1. Squarewear
  2. Arduino UNO
  3. Wooden Ply
  4. Drilling Equipment
  5. Screws
  6. Saw
  7. Red fancy cloth
  8. Willpower

Documenting My Progress

Day 2

I learned how to solder and it was fun! Soldering did take a ton of time, but finally seeing this neopixel band light up was extremely satisfying.

Day 3

Day 4

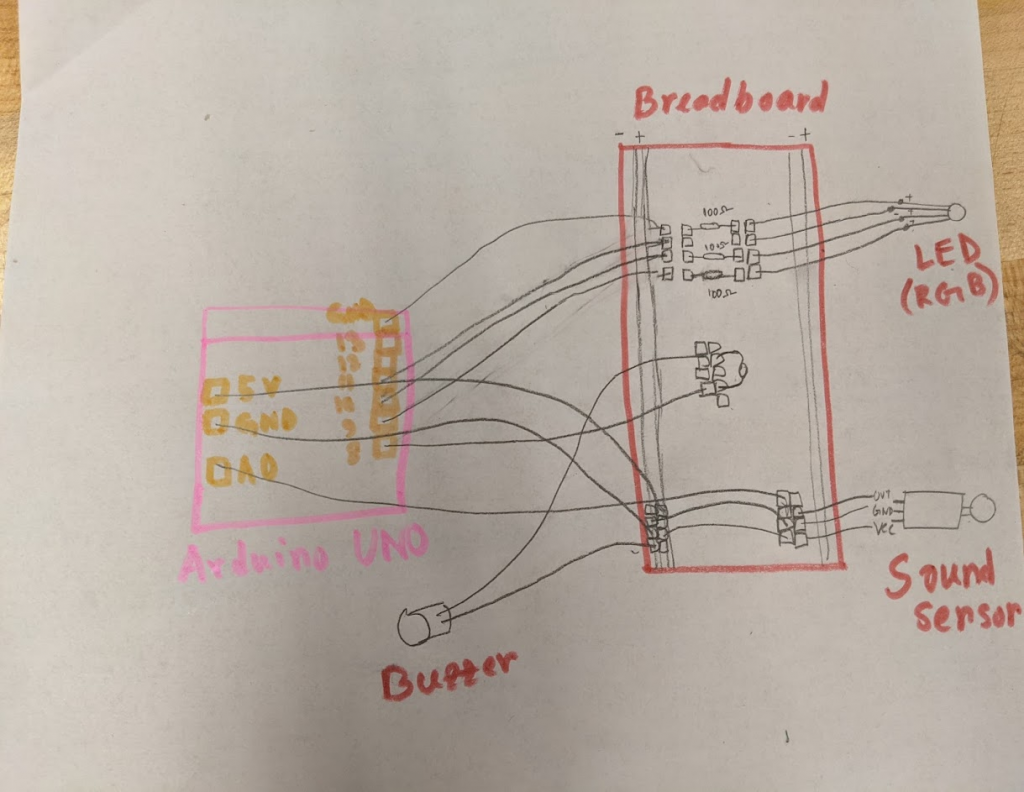
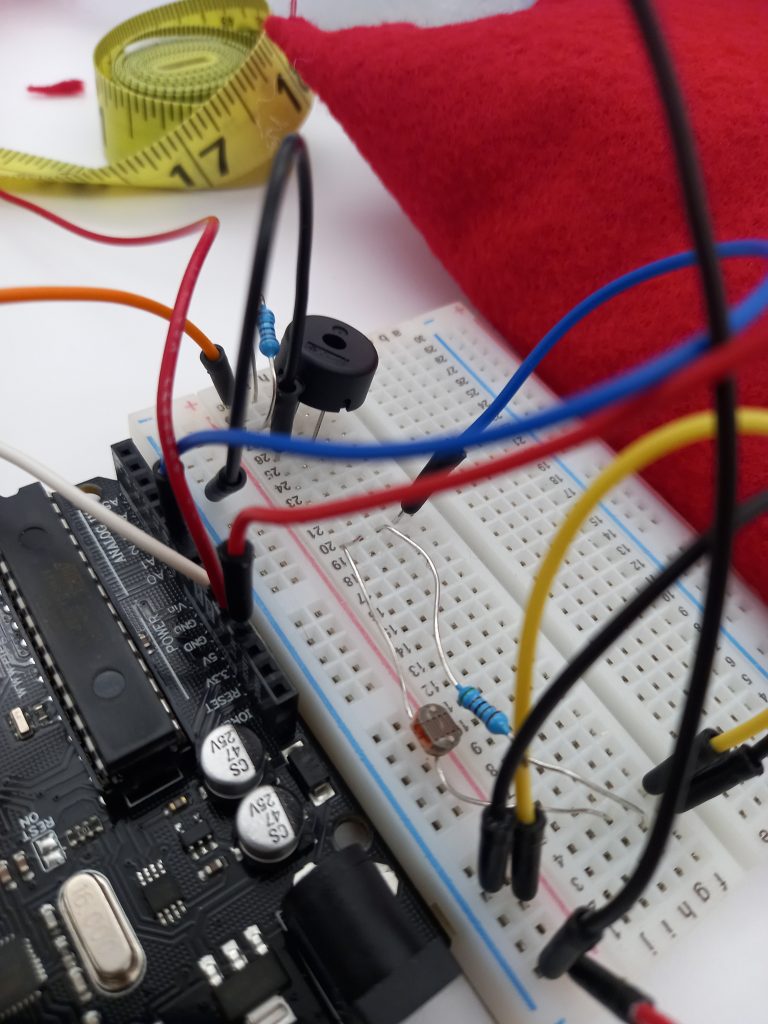
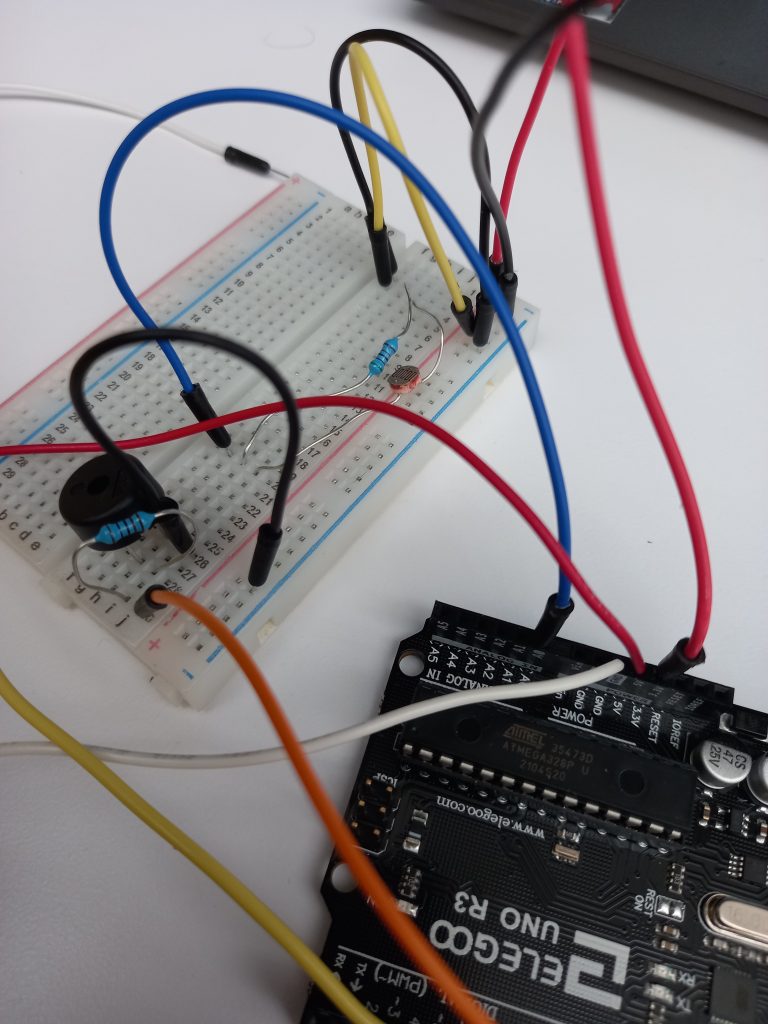
Component Connections

My Code

// NeoPixel Ring simple sketch (c) 2013 Shae Erisson
// Released under the GPLv3 license to match the rest of the
// Adafruit NeoPixel library

#include <Adafruit_NeoPixel.h>
#ifdef __AVR__
 #include <avr/power.h> // Required for 16 MHz Adafruit Trinket
#endif


//-----------ALL CONSTANTS AND PIN CONNECTIONS --------------------------
// Which pin on the Arduino is connected to the NeoPixels?
#define PIN        6 // Neopixel Attachment
#define BUZZER_PIN 9 //Where is the buzzer attached
const int ldrPin = A0;
#define DELAYVAL 500 // Time (in milliseconds) to pause between pixels
#define NUMPIXELS 16 // Popular NeoPixel ring size // How many NeoPixels are attached to the Arduino?
#define LED_COUNT 12


// When setting up the NeoPixel library, we tell it how many pixels,
// and which pin to use to send signals. Note that for older NeoPixel
// strips you might need to change the third parameter -- see the
// strandtest example for more information on possible values.
Adafruit_NeoPixel pixels(NUMPIXELS, PIN, NEO_GRB + NEO_KHZ800);
Adafruit_NeoPixel strip(LED_COUNT, PIN, NEO_GRB + NEO_KHZ800);


void setup() {
  
  Serial.begin(9600);
  pinMode(PIN, OUTPUT);
  pinMode(ldrPin, INPUT);
  pixels.begin(); // INITIALIZE NeoPixel strip object (REQUIRED)
  pixels.clear();

}

void loop() {
  int ldrStatus = analogRead(ldrPin);

//CHECKINGG FOR LIGHT 
  if (ldrStatus <= 200)
  {
    Serial.print("Its Dark, Turn on the LED:");
    Serial.println(ldrStatus);
    pixels.clear(); // Set all pixel colors to 'off'

  }
  
  else
  {
    Serial.print("Its Bright, Turn off the LED:");
    Serial.println(ldrStatus);
    pixels.clear(); // Set all pixel colors to 'off'
    //Now turn the light on
    pixels.show();   // Send the updated pixel colors to the hardware.


  // The first NeoPixel in a strand is #0, second is 1, all the way up
  // to the count of pixels minus one.
  for(int i=0; i<NUMPIXELS; i++) { // For each pixel...

    // pixels.Color() takes RGB values, from 0,0,0 up to 255,255,255
    
  theaterChase(strip.Color(150, 0, 0), 50); // Red, half brightness
  playSong();
  theaterChase(strip.Color(127, 127, 127), 50); // White, half brightness
  theaterChase(strip.Color(127,   0,   0), 50); // Red, half brightness
  theaterChase(strip.Color(  0,   0, 127), 50); // Blue, half brightness
  rainbow(100);             // Flowing rainbow cycle along the whole strip

  }
}
}

// Add the notes needed using the note sheet. Spaces acts like breaks
char song[] = "mmggaag mmggaag mmeeddc mmffeed mmggaag mmggadm";

// beats per note
// Add the beats needed to complete the song. 
// The amount of beats should match the amount of notes and spaces
int beats[] = {  5, 1, 1, 7, 1, 3, 2, 4, 
                 5, 1, 1, 7, 1, 3, 2, 4,
                 1, 3, 4, 2, 2, 1, 1, 2, 
                 5, 1, 1, 7, 1, 3, 2, 4,
                 5, 1, 1, 7, 1, 3, 2, 4, 
                 5, 1, 1, 7, 1, 3, 2, 4};
//------------Modify ONLY The Code Above To Update the Melody ----------

//---------------- Do Not Edit The Code Below------------------------
// speed of song
int tempo = 300;
// convenience notes means we don't need Pitches.h
// names of the notes
char names[] = { 'c', 'd', 'e', 'f', 'g', 'a', 'b', 'C' };
// corresponding tones for C4 - B4, C5 (looked up values from Pitches.h)
int tones[] = { 262, 295, 330, 349, 392, 440, 494, 523 };

// play the song using the variables: song, songLength, beats
void playSong()
{
  delay( 5000 );

  // for each note in the melody:
  for (int noteIndex = 0; noteIndex < sizeof(song); noteIndex++)
  {
  // if it's a space
  if (song[noteIndex] == ' ')
  {
    // rest
    delay( beats[noteIndex] * tempo/5);
  }
  // otherwise it's the name of a note
  else
  {
    // play the note at that index for the specified time
    playNote(song[noteIndex], beats[noteIndex] * tempo);
  }
      // pause between notes
  delay(tempo);
  }
}
// play the tone corresponding to the note name
void playNote(char noteName, int duration)
{
  // loop through the names
  for (int i = 0; i < sizeof(names); i++)
  {
  // if we found the right name
  if (names[i] == noteName)
  {
    // play the tone at the same index
    tone( BUZZER_PIN, tones[i], duration); 
    // don't bother looking through the rest of the names
    break;
  }
  }
}


//------------------Additional Neopixel functions----------------------------
void theaterChase(uint32_t color, int wait) {
  for(int a=0; a<10; a++) {  // Repeat 10 times...
    for(int b=0; b<3; b++) { //  'b' counts from 0 to 2...
      strip.clear();         //   Set all pixels in RAM to 0 (off)
      // 'c' counts up from 'b' to end of strip in steps of 3...
      for(int c=b; c<strip.numPixels(); c += 3) {
        strip.setPixelColor(c, color); // Set pixel 'c' to value 'color'
      }
      strip.show(); // Update strip with new contents
      delay(wait);  // Pause for a moment
    }
  }
}

// Rainbow cycle along whole strip. Pass delay time (in ms) between frames.
void rainbow(int wait) {
  // Hue of first pixel runs 5 complete loops through the color wheel.
  // Color wheel has a range of 65536 but it's OK if we roll over, so
  // just count from 0 to 5*65536. Adding 256 to firstPixelHue each time
  // means we'll make 5*65536/256 = 1280 passes through this loop:
  for(long firstPixelHue = 0; firstPixelHue < 5*65536; firstPixelHue += 256) {
    // strip.rainbow() can take a single argument (first pixel hue) or
    // optionally a few extras: number of rainbow repetitions (default 1),
    // saturation and value (brightness) (both 0-255, similar to the
    // ColorHSV() function, default 255), and a true/false flag for whether
    // to apply gamma correction to provide 'truer' colors (default true).
    strip.rainbow(firstPixelHue);
    // Above line is equivalent to:
    // strip.rainbow(firstPixelHue, 1, 255, 255, true);
    strip.show(); // Update strip with new contents
    delay(wait);  // Pause for a moment
  }
}

(11/27) Feedback and Listening

In this era, we constantly work with our minds. Gone are the days of labor-intensive jobs, now we have robots to do all of it. But amidst all of this mental overwork, it becomes intensely difficult to make space for receiving and utilizing feedback effectively. We are so engrossed in moving from one task to another that pausing to reflect on whether our teammates think what we’re doing right or wrong just fades into the background.

Moreover, the current times make it even more challenging to pass effective feedback without other individuals taking it personally or getting hurt. That is the reason why I find it important for us to detach ourselves from our work whenever we are taking feedback on it. It is important for us to know that the person is evaluating the task at hand and not judging us or our capabilities as a person.

Another strategy we can utilize to improve how we take feedback is to constantly ask clarifying questions. Instead of assuming what the other individual is saying, we should make sure that we understand what they are truly intending to say.

Group Project: Tranquility Detector

Project Aim

Develop a noise detector that buzzes and lights up when the sound levels reach above a certain level acceptable in the tranquility room in the dining hall.

Team Members

Sulagna Saha, Yu Wati Nyi, Mumtaz Fatima

Documentation of Our Build Process

  1. Collect the required components from the Arduino Kit. The required components were: Arduino Uno kit, Breadboard, Buzzer, LED Light, Sound Sensor
  2. Connect the Arduino Uno to the breadboard and make the necessary connections with the LED bulb, Buzzer, and Sound Sensor
  3. Modify the code and add the functionality to activate buzzer whenever the sound sensor detects a value, it saves the value, finds the peak value, uses this value of the detected sound to convert it into volts.
  4. Cardboard box: 
    • Cut cardboard to create a box with 2 open lateral ends. 
    • Make 3 holes to add the components. One hole on the top to attach the sound sensor and 2 holes on the side to attach the LED and the buzzer
  5. Test the connections and view the serial monitor to check whether the code works as intended
  6. Finally attach the breadboard to the bottom of the cardboard box and cover the 2 open ends.

Circuit Diagram

Code

/*
 MAX4466 (adafruit mic)
 
 Written by Shani Mensing, edited by Audrey St. John
Modified by Yu Wati Nyi, Mumtaz Fatima, Sulagna Saha
 
 Circuit: microphone VCC connected to 3.3V, OUT to analog input A0
 */

// hook up the out of the mic to analog input A0
int MIC_IN = A0;

// Sample window width in milliseconds (50 ms = 20Hz)
int sampleWindow = 50; 
int red_light_pin= 11;
int green_light_pin = 10;
int blue_light_pin = 9;
Int buzzer_pin = 8;

/**
 * Initialization code
 **/
void setup()
{
   // open serial port and set data rates to 9600 bps (bits-per-second)
   // this lets us communicate to/from the arduino
   Serial.begin(9600);
   
   pinMode( MIC_IN, INPUT );
   pinMode(red_light_pin, OUTPUT);
   pinMode(green_light_pin, OUTPUT);
   pinMode(blue_light_pin, OUTPUT);
   pinMode(buzzer_pin, OUTPUT);
}

/**
 * Main program loop happens constantly.
 **/
void loop()
{
    // read the analog sensor as volts
    double soundSensed = sampleSoundPeak();
    
    // convert to volts
    double volts = (soundSensed * 3) / 1024; 
    if(volts<1){
      RGB_color(0, 255, 0); // Green
      delay(1000);
    }
    else{
      RGB_color(255, 0, 255); // Magenta
      delay(1000);
      tone(buzzer_pin, 1000); // Send 1KHz sound signal...
      delay(1000);        // ...for 1 sec
      noTone(buzzer_pin);     // Stop sound...
      delay(1000);
    }
    
    // print it out
    Serial.println(volts);
}

/////////////// Our own methods

/**
 * Sense biggest input difference are being input from the analog MIC sensor
 * over a certain "window" of time. 
 * Values returned are in the range 0 - 1024.
 **/
double sampleSoundPeak()
{
    // record start time 
    double startMillis = millis(); 

    // this will be the highest peak, so start it very small    
    int signalMax = 0;
    
    // this will be the lowest peak, so start it very high
    int signalMin = 1024;
    
    // will hold the current value from the microphone
    int sample;
    
    // collect data for 50 ms
    while ( (millis() - startMillis) < sampleWindow ) 
    {
        // read a value from mic and record it into sample variable
        sample = analogRead( MIC_IN );
        
        // toss out spurious readings
        if (sample < 1024)
        {
        
            // if the current sample is larger than the max
             if (sample > signalMax)
             {      
                   // this is the new max -- save it
                   signalMax = sample; 
             }
             // otherwise, if the current sample is smaller than the min
             else if (sample < signalMin)
             {
                   // this is the new min -- save it
                   signalMin = sample; 
             }
         }
     }
     
     // now that we've collected our data,
     // determine the peak-peak amplitude as max - min
     int peakDifference = signalMax - signalMin; 
    
     // give it back to the caller of this method
     return peakDifference;
}
void RGB_color(int red_light_value, int green_light_value, int blue_light_value)
{
  analogWrite(red_light_pin, red_light_value);
  analogWrite(green_light_pin, green_light_value);
  analogWrite(blue_light_pin, blue_light_value);
}

Project Display

Project: WelcomeBot

Project Aim

Making a wooden bot that lights up when someone gets close to the distance sensor.

Process

1. Cutting the wooden ply into small blocks

2. Drilling holes into the wooden blocks

3. Connect the distance sensor

4. Make the connections with the bot

My Reflection

Why did this project not work out as intended?

1. Not asking for help early on in the project

I realized that I rarely ask for help when I need it. This ends up isolating me in the process. That is why I think that I should ask for help early on the next time I work on a project that seems challenging.

2. Less proficiency in technical components

I found it difficult to use the Arduino to connect the wires without the breadboard. This again connects back to how I did not ask for help early on. Also, I tend to get intimidated by thinking that I am not good enough at this topic so I lose my motivation to keep going.

How do I think I should improve?

  1. Keep working on the problem until I find the solution or until I can ask someone else for help.
  2. Not give up when the problem seems too hard.
  3. Not rely on motivation, instead work on problems even when you’re low on motivation.

Destination 4: Sense of Belonging Through Arduino Uno

As my LearningShip reaches its third destination, it tides along the waves of doubt. The doubt associated with “Will I succeed?” and “Do I belong here?”.

But to steer through these doubts, it’s important for the captain (aka me) to truly define what success actually means to me?

In the words of another great sailor (sailor of words, you know), “If, however, you want to succeed because you love the excitement of pushing your potential and exploring your world and new experiences, if you want to succeed because life is short and why not fill it with as much activity as possible, then you will win.”

I believe that all too often, we associate success with ‘winning’ – being the best, getting the best, becoming the best. And suddenly when you’re not the best, you’re not succeeding anymore. But, is it true? What is our metric of success and how do we not let other people’s metrics influence ours?

As overly optimistic as it sounds, I believe that all things “are” for us. We might be naturally good at some things and mediocre at. But if you really think about it, what do you define as ‘being good at’? Don’t we often gauge how we are performing in relation to others? So if there’s someone who is a better public speaker than you, you consider yourself to have the same level of skill and then suddenly you feel that you’re not a “good enough” public speaker.

So, it’s important for us to set our own metrics in order to feel that we belong in a space. Technology is an industry where we all belong. It’s just that we need to define what belongingness means to us and how we can pave our own way to achieve that level of belongingness.