Group Project: Tranquility Detector

Project Aim

Develop a noise detector that buzzes and lights up when the sound levels reach above a certain level acceptable in the tranquility room in the dining hall.

Team Members

Sulagna Saha, Yu Wati Nyi, Mumtaz Fatima

Documentation of Our Build Process

  1. Collect the required components from the Arduino Kit. The required components were: Arduino Uno kit, Breadboard, Buzzer, LED Light, Sound Sensor
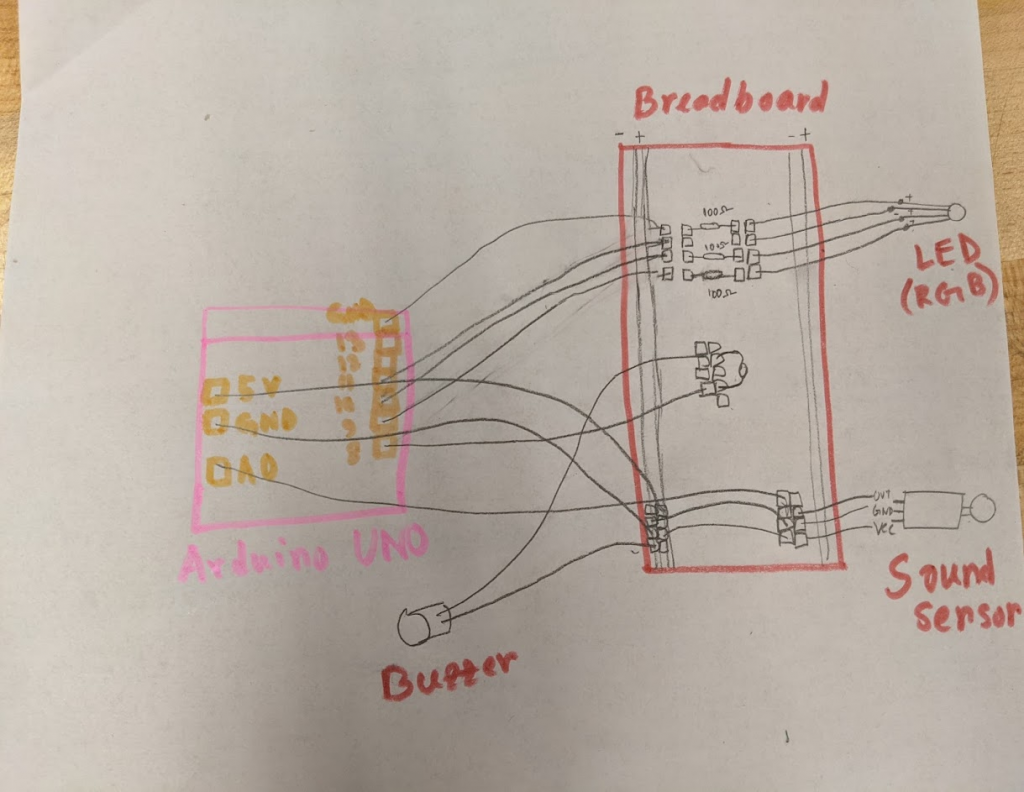
  2. Connect the Arduino Uno to the breadboard and make the necessary connections with the LED bulb, Buzzer, and Sound Sensor
  3. Modify the code and add the functionality to activate buzzer whenever the sound sensor detects a value, it saves the value, finds the peak value, uses this value of the detected sound to convert it into volts.
  4. Cardboard box: 
    • Cut cardboard to create a box with 2 open lateral ends. 
    • Make 3 holes to add the components. One hole on the top to attach the sound sensor and 2 holes on the side to attach the LED and the buzzer
  5. Test the connections and view the serial monitor to check whether the code works as intended
  6. Finally attach the breadboard to the bottom of the cardboard box and cover the 2 open ends.

Circuit Diagram
Code

/*
 MAX4466 (adafruit mic)
 
 Written by Shani Mensing, edited by Audrey St. John
Modified by Yu Wati Nyi, Mumtaz Fatima, Sulagna Saha
 
 Circuit: microphone VCC connected to 3.3V, OUT to analog input A0
 */

// hook up the out of the mic to analog input A0
int MIC_IN = A0;

// Sample window width in milliseconds (50 ms = 20Hz)
int sampleWindow = 50; 
int red_light_pin= 11;
int green_light_pin = 10;
int blue_light_pin = 9;
Int buzzer_pin = 8;

/**
 * Initialization code
 **/
void setup()
{
   // open serial port and set data rates to 9600 bps (bits-per-second)
   // this lets us communicate to/from the arduino
   Serial.begin(9600);
   
   pinMode( MIC_IN, INPUT );
   pinMode(red_light_pin, OUTPUT);
   pinMode(green_light_pin, OUTPUT);
   pinMode(blue_light_pin, OUTPUT);
   pinMode(buzzer_pin, OUTPUT);
}

/**
 * Main program loop happens constantly.
 **/
void loop()
{
    // read the analog sensor as volts
    double soundSensed = sampleSoundPeak();
    
    // convert to volts
    double volts = (soundSensed * 3) / 1024; 
    if(volts<1){
      RGB_color(0, 255, 0); // Green
      delay(1000);
    }
    else{
      RGB_color(255, 0, 255); // Magenta
      delay(1000);
      tone(buzzer_pin, 1000); // Send 1KHz sound signal...
      delay(1000);        // ...for 1 sec
      noTone(buzzer_pin);     // Stop sound...
      delay(1000);
    }
    
    // print it out
    Serial.println(volts);
}

/////////////// Our own methods

/**
 * Sense biggest input difference are being input from the analog MIC sensor
 * over a certain "window" of time. 
 * Values returned are in the range 0 - 1024.
 **/
double sampleSoundPeak()
{
    // record start time 
    double startMillis = millis(); 

    // this will be the highest peak, so start it very small    
    int signalMax = 0;
    
    // this will be the lowest peak, so start it very high
    int signalMin = 1024;
    
    // will hold the current value from the microphone
    int sample;
    
    // collect data for 50 ms
    while ( (millis() - startMillis) < sampleWindow ) 
    {
        // read a value from mic and record it into sample variable
        sample = analogRead( MIC_IN );
        
        // toss out spurious readings
        if (sample < 1024)
        {
        
            // if the current sample is larger than the max
             if (sample > signalMax)
             {      
                   // this is the new max -- save it
                   signalMax = sample; 
             }
             // otherwise, if the current sample is smaller than the min
             else if (sample < signalMin)
             {
                   // this is the new min -- save it
                   signalMin = sample; 
             }
         }
     }
     
     // now that we've collected our data,
     // determine the peak-peak amplitude as max - min
     int peakDifference = signalMax - signalMin; 
    
     // give it back to the caller of this method
     return peakDifference;
}
void RGB_color(int red_light_value, int green_light_value, int blue_light_value)
{
  analogWrite(red_light_pin, red_light_value);
  analogWrite(green_light_pin, green_light_value);
  analogWrite(blue_light_pin, blue_light_value);
}
Project Display

11/3 Milestone 2: Music Box Project

My Music Box

Scientists define self-regulated learning as a cyclic process of setting tasks, developing strategies, evaluating the effectiveness of those strategies, and making necessary changes to reach one’s goal.

However, most of us as college students believe self-regulated learning seems easier said than done. It takes constant time (which college students lack) and energy to be implemented on a regular basis. Under the mountain of responsibilities, constant decision-making, adjustments, and assignments, it is difficult for one to pause and truly reflect on their learning strategy.

I followed the same school of thought until recently when I had to take the time out to complete this assignment. When I sat down to reflect on what I learned from the assignment, I realized that jumping haphazardly into a project might not be the best way of accomplishing it.

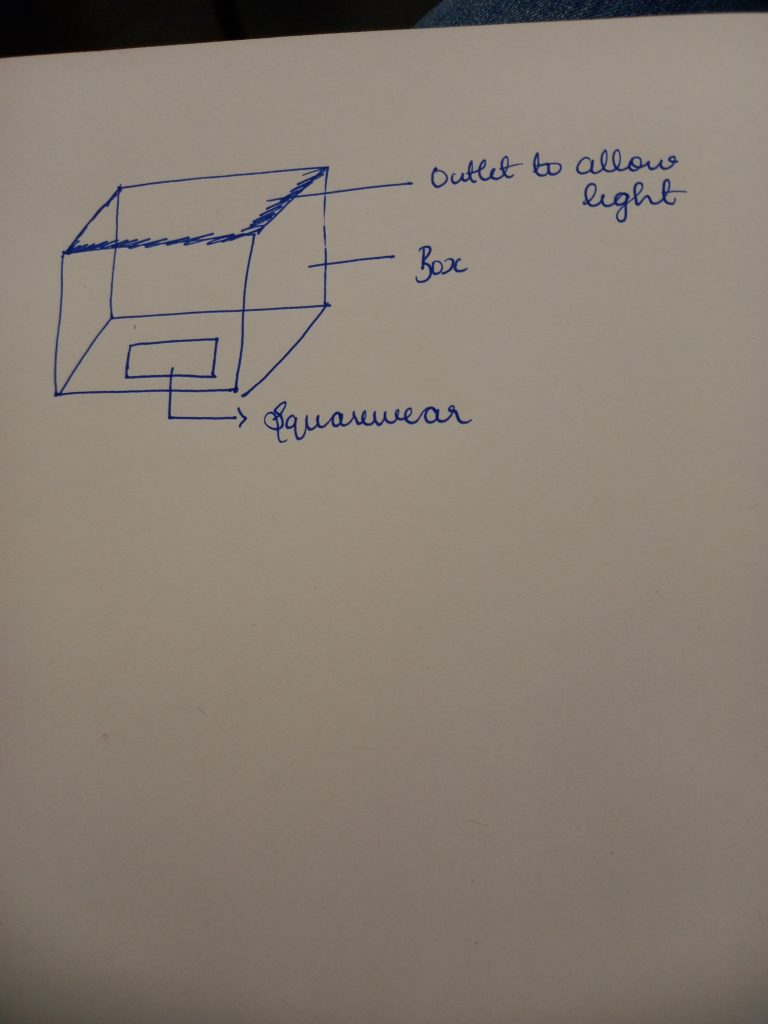
Music Box Sketch

I followed the same school of thought until recently when I had to take the time out to complete this assignment. When I sat down to reflect on what I learned from the assignment, I realized that jumping haphazardly into a project might not be the best way of accomplishing it. You may then ask the following question:

What is the biggest hindrance to self-regulated learning?

We’re always on the go. When we are constantly surrounded by people who are always on the go and never seem to stop, we tend to fall into the same trap. It appears as if it is always necessary to be working on something, doing something, becoming someone. This constant pressure of doing something deprives us of the time where we can actually sit down and reflect on our learning journey so far.

It appears as if we live to follow a to-do list and not the other way around. That is why it is important to first accept that we should not be filling every single minute of our day with “productivity”. That is often the opposite of productivity.

How Did I Learn To Self Regulate Through This Project?

I realized that I should always come up with a plan in order to complete something successfully. More often than not, I jump into a project haphazardly, only to realize that I have wasted my precious time and energy that could have been spent doing other important things.

Next, I learned that most problems are simpler than we make them appear. If a project isn’t working even after we spent countless hours working on it, we must learn to either ask for help or let it go. Considering it as the end of the world would not help in magically fixing the project.

Finally, I learned that there are concepts and ideas that occur to us with time. A part of self-regulated learning is to acknowledge that we will not immediately find answers to everything, but at least we would have the knowledge of recognizing what is working and what is not.

Code


/*
 Melody
Plays a melody on SquareWear
* use buzzer on digital pin 9
Written by Shani Mensing, edited by Audrey St. John
From example code in the public domain.
http://arduino.cc/en/Tutorial/Tone
*/
 
// Output for SquareWear
// specific to SquareWear
#define BUZZER_PIN 9
 
// squarewear specific
#define LIGHT_SENSOR_PIN A0
 
// current index of note that is playing
int currentNoteIndex = 0;
 
// deciding if there's enough light
// increase to require more ambient light before the led is on
// decrease to require less
int minLightValue = 100;
 
// notes for the song. A space represents a rest
char song[]= "ccggaag ffeeddc ggffeed ggffeed ccggaag ffeeddc "; 
// the number of notes in the song
int songLength = 30;
 
// beats per note
int beats[] = { 1, 1, 1, 1, 1, 1, 2, 1, 1, 1, 1, 1, 1, 2,
               1, 1, 2, 1, 1, 1, 2, 2, 1, 1, 1, 1, 1, 1, 4};
          
// speed of song
int tempo = 300;
 
// names of the notes
char names[] = { 'c', 'd', 'e', 'f', 'g', 'a', 'b', 'C', 'D', 'E', 'F', 'G' };
// corresponding tones for C4 - B4, C5-G5 from Pitches.h
int tones[] = { 262, 295, 330, 349, 392, 440, 494, 523, 587, 659, 698, 784 };
// number of notes
int numberConvenienceNotes = 12;
 

void setup()
{
 Serial.begin(9600);
 
if(checkBrightness())
( BUZZER_PIN, OUTPUT );
}


boolean checkBrightness()
{
 int lightValue = analogRead(LIGHT_SENSOR_PIN);

 if (lightValue >= minLightValue)
   return true;
 else
   return false;
}

 
// play the next note in the song using the variables: song, songLength, beats
void playNextNote()
{
   // if it's a space
   if (song[currentNoteIndex] == ' ')
   {
     // rest
     delay( beats[currentNoteIndex] * tempo/5);
   }
   // otherwise it's the name of a note
   else
   {
       // play the note at that index for the specified time
       playNote(song[currentNoteIndex], beats[currentNoteIndex] * tempo);
   }
  
   // pause between notes
   delay(tempo);
   currentNoteIndex = (currentNoteIndex+1)%songLength;
}
 
// play the tone corresponding to the note name
void playNote(char noteName, int duration)
{
  if(checkBrightness()){
 // loop through the names
 for (int i = 0; i < numberConvenienceNotes; i++)
 {
   // if we found the right name
   if (names[i] == noteName)
   {
     // play the tone at the same index
     tone( BUZZER_PIN, tones[i], duration);
    
     // don't bother looking through the rest of the names
     break;
   }
 }
  }
}