Author: ljaeger@mtholyoke.edu
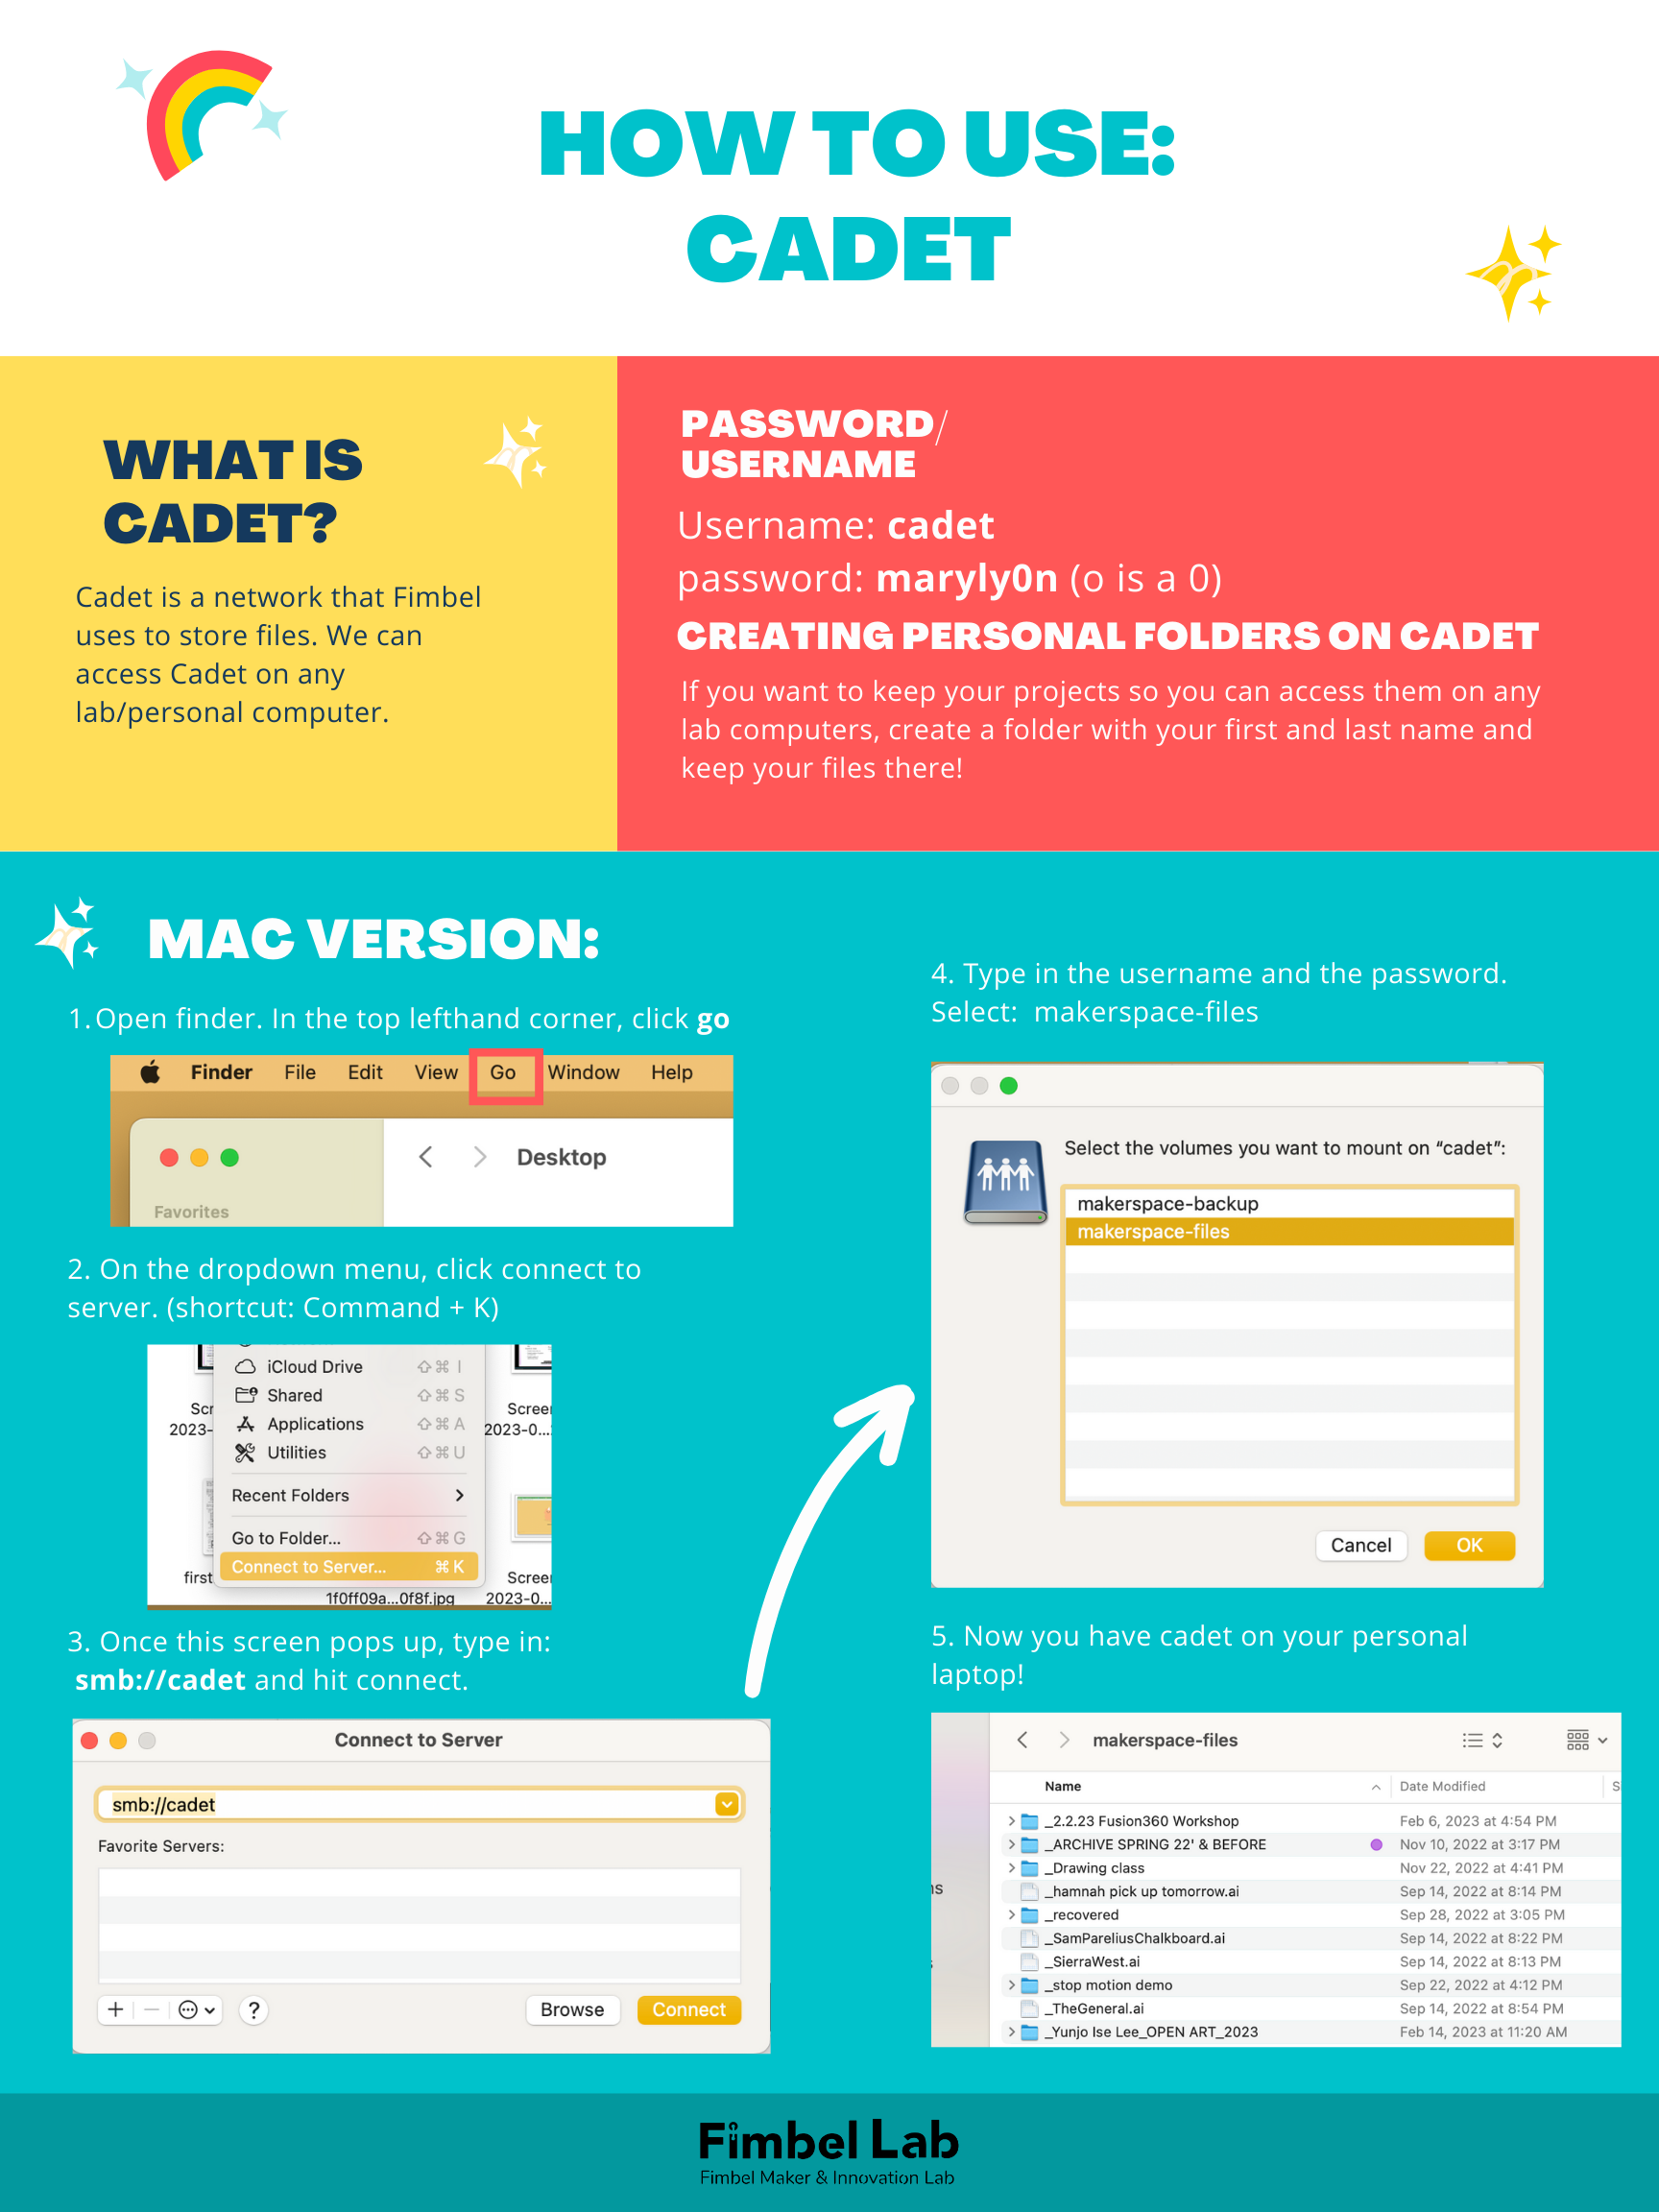
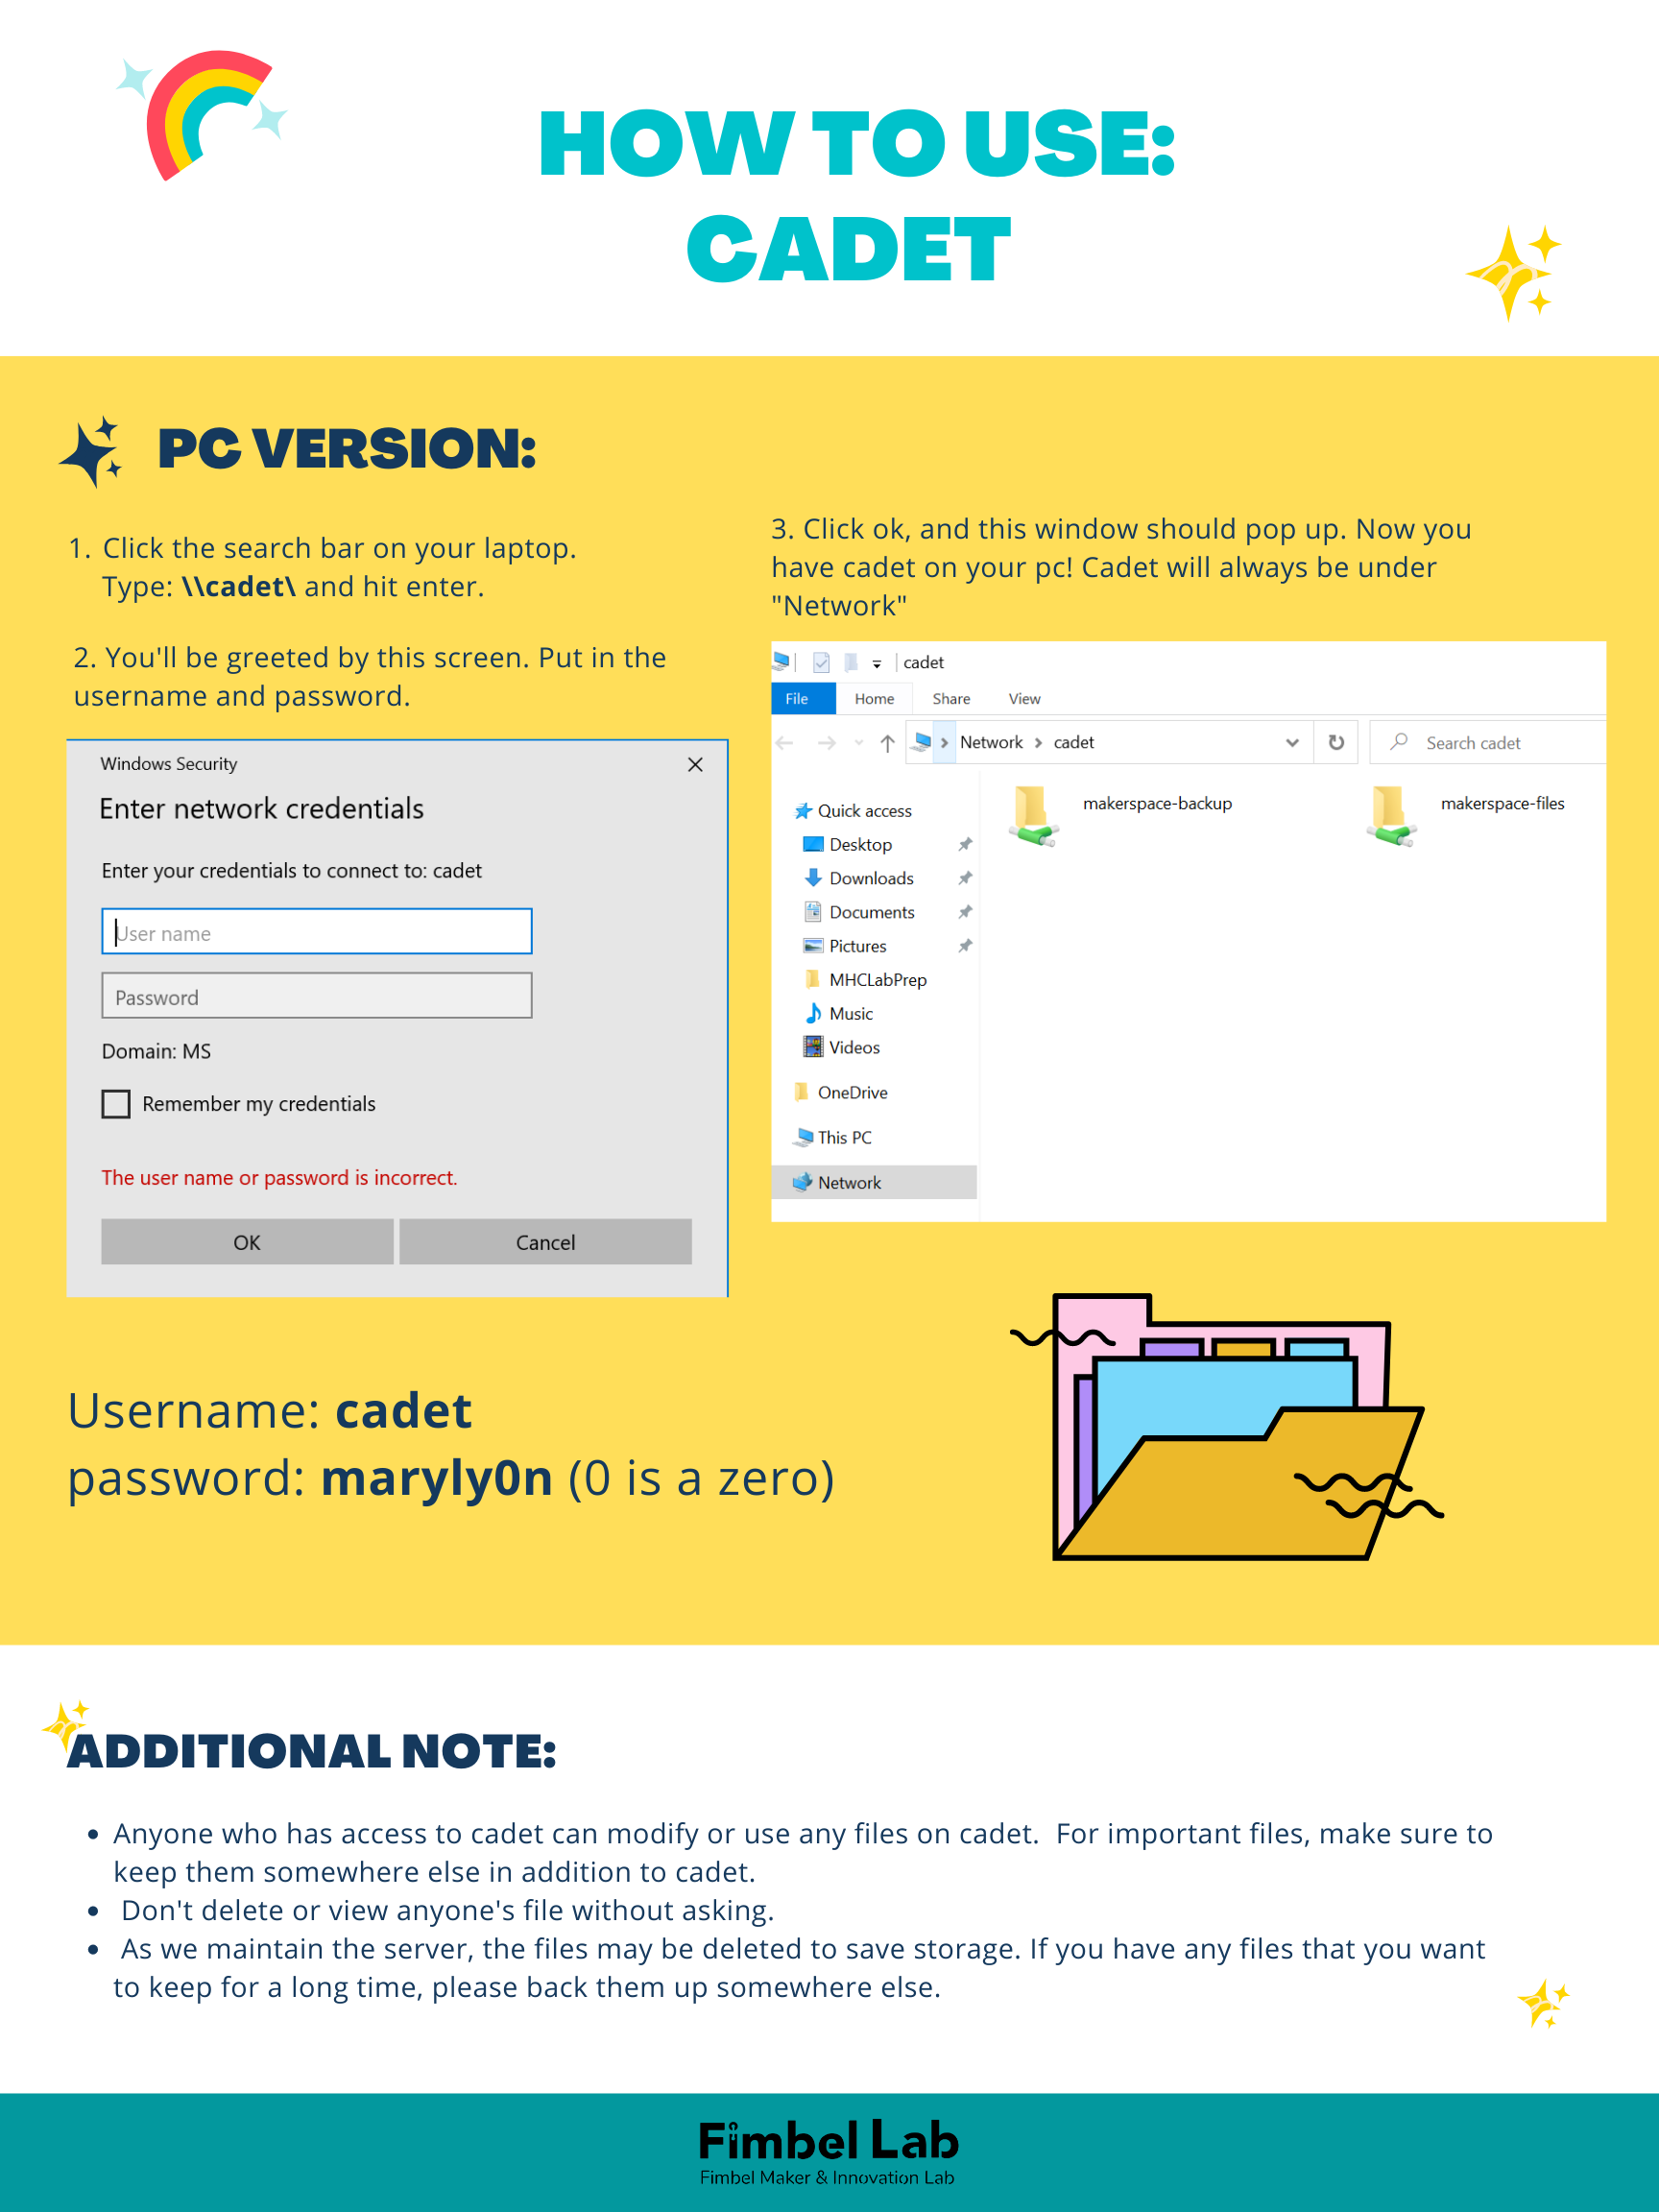
Using ‘cadet’ network storage
Jigsaw
Working with Arduino code
Build an Arduino pulse sensor
Using the Documentation Room
These documents will help you get started with the Canon T7 camera and the Documentation Room.
When you’re done shooting, see Adjusting Camera RAW images with Adobe Photoshop
Adjusting Camera Raw images with Adobe Photoshop
Photoshop is a big, complex piece of software. You’re not going to learn everything about it in a day or even a year, but that’s OK — you have to start somewhere!
In the Camera Raw environment, you can make all kinds of adjustments to color, contrast, etc. There are many ways to do this; it’s more art than science. Here’s a basic workflow for processing raw camera files:
Before you start
- Set up your work environment to reduce glare on your monitor.
- Turn up the monitor brightness so that the display is easy to see (if working on a laptop, plug in your charging cable).
- Wipe your monitor clean of dust and junk.
Import your images into the Camera Raw editor
- Copy your images from the camera’s SD card to your computer. They will appear as Raw files with an extension like .CR2, .NEF, etc.
- Select the camera image files you wish to work on
- Right-click on them and open with Photoshop
- The Camera Raw environment appears
Adjust white balance
- Expand the Basic controls and find the White Balance settings.
- Select Custom white balance, then click on the eyedropper icon
- With the eyedropper tool, select an area of your image that should be pure white. This could be the white patch of the color chart. Neutral gray works too.
Adjust exposure and contrast
- Look at the histogram at the upper right corner.
- If histogram has a flat spot on the right side (highlight), your image is underexposed: move the Exposure slider to the right to increase exposure
- If histogram is flat on the left side (shadow), image is overexposed: slide left to reduce exposure
- Changes to exposure can also affect contrast (the range between darkest & lightest pixels).
- Move the Contrast slider until image looks balanced.
- For finer contrast control, you can move the Highlights, Shadows, Whites and Blacks sliders as well.
- Be aware of how your changes affect both the image and the histogram.
- Look carefully at the entire image and use your aesthetic judgement.
- Keep it subtle — most of these controls will make the image look weird / fake if pushed too far in either direction.
Reduce noise
Raw files tend to have a grainy quality that you can smooth out for a more pleasing image. You’ll usually notice it more in images that needed bigger Exposure adjustments.
- Collapse the Basic controls and expand the Detail section.
- Click on the zoom control at lower left and set the magnification to at least 100%.
- While holding down the spacebar (the cursor becomes a hand), click and drag your mouse to navigate to a detailed area of the image.
- Experiment with the Noise Reduction and Color Noise Reduction controls. Try something like :
- Noise Reduction = 50; Detail = 20; Contrast = 20
- Color Noise Reduction = 50; Detail = 20; Smoothness = 20
- Changes that you made to Exposure and Contrast in previous steps may increase noise. Watch out for multicolored noise in shadow areas.
- You may not need to add Sharpening, but try the controls and see what happens.
- Remember that every image is different and there is no “one size fits all” solution for these settings. Trust your eyeballs!
Remove lens distortion
- Open the Optics controls
- Enable Lens Profile Correction (this fixes geometric lens distortion)
- Enable Remove Chromatic Aberrations (fixes color artifacts introduced by the lens)
- Through the magic of XMP metadata, Photoshop knows what kind of camera and lens the image was made with, and applies appropriate corrections. This is especially helpful when shooting flat artwork.
Next steps
- Click on Open to continue working on the image in Photoshop.
- Or just save it to native Photoshop format (.psd) to “bake in” your adjustments. The Raw file remains untouched.
- The changes you made in the Camera Raw environment are saved in a separate “sidecar” file with the .xmp extension.
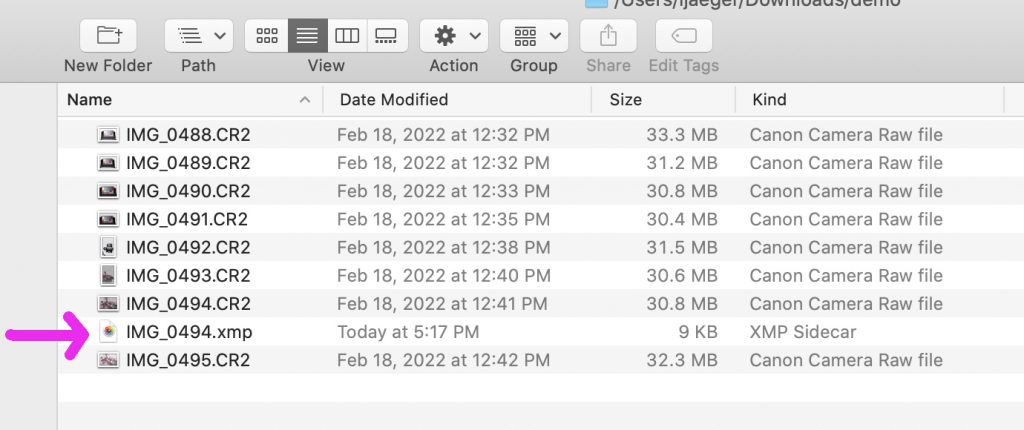
- The next time you open the Raw file, it will come up with your saved settings applied, as long as the .xmp file is still present in the same folder. This allows you to non-destructively edit your settings later!
- To revert the raw file to its original state, simply trash the .xmp file.
- The .xmp file is just a bunch of xml. You can open it with a text editor and see what sort of info is getting saved, if you’re interested.
Using the Form2 3D printer
Industrial Sewing Machine: Bernina 1008
How To Sew A Face Mask
Photo Engraving with the Laser Cutter
Sewing Machine Stamp Requirements
Sewing Machine General Knowledge Test
Getting started with Arduino
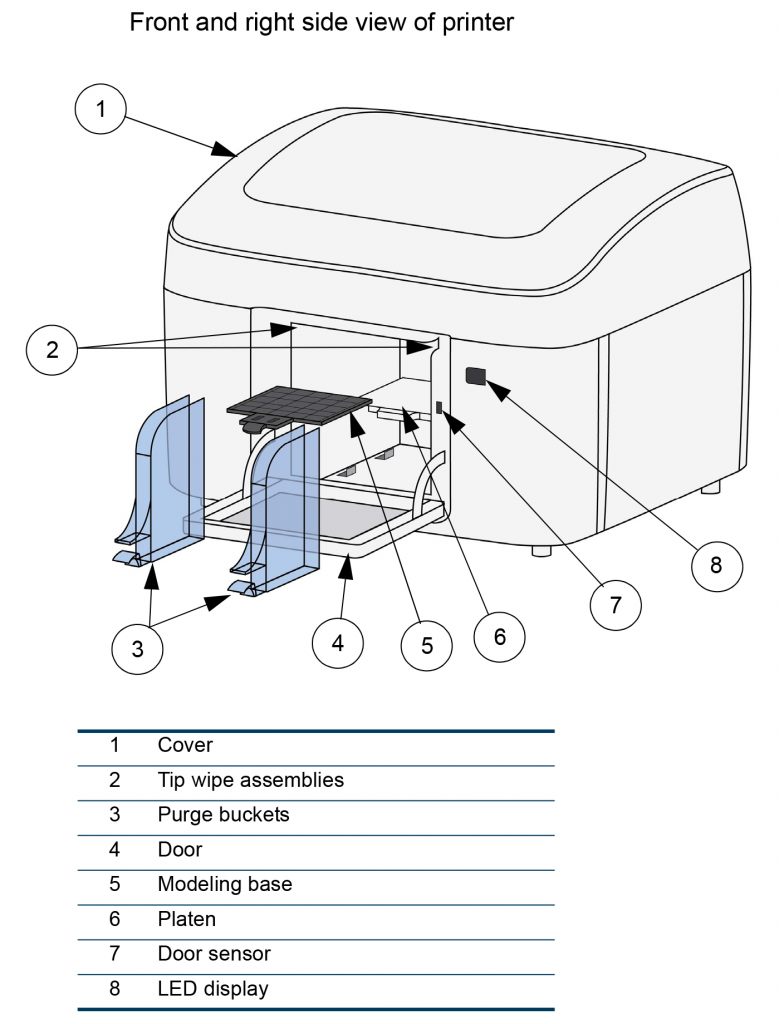
Mojo 3D printer
Before you start:
- Save your 3d file in .stl format and copy it to cadet.
- Make sure the printer platen has a clean modeling base on it (the removable black plastic tray)
- Printer should be powered on with LED showing steady green.
- Software setup steps are in the video below.
When your print is completed:
- Wiggle the modeling base slightly while pulling toward you to remove it from the printer
- Gently crack the printed part(s) off the modeling base. Smaller parts should pop right off with a little “persuasion” from a chisel or scraper. For larger parts, it helps to bend the modeling base a bit, to crack the support material away from the base.
- Put your part(s) in the WaveWash and turn it on. Use the 3d printed sieve basket for very small parts.
- The WaveWash runs for 8 hours. This is usually enough to remove the support material. You can run it more than once if you need to.
- When all support material is dissolved, fish your part(s) out with the metal strainer. Wash printed part(s) thoroughly with warm water and a little dish detergent.
- Wash your hands and anything that came in contact with the WaveWash solution. The WaveWash solution is safe to go down the sink drain, but avoid eye contact or prolonged skin contact with it, and obviously don’t drink any.
- When done, wipe down work area with paper towels.
Clean up and reset the Mojo for the next job:
- Place the used modeling base on the mount near the Mojo.
- Using a wide chisel, carefully scrape away any remaining model or support material. Talk to Fimbel staff if you haven’t already had sharp tool training.
- Grab a shop vac and vacuum up the plastic fragments which by now have gotten everywhere. Also vacuum any stray material from the inside of the Mojo.
- Pull the two purge buckets from the Mojo (pinch down on the little tabs at the bottom) and dump their contents into the trash.
- Find the two tip wipe assemblies (thumbnail-size wire brushes where the printer “wipes its nose” during operation). You can lift them right off their pegs and inspect them. Clean them of any residual material.
- Put all parts back in place, and verify that you get a steady green LED when you close the door of the Mojo.
- Quit the Mojo Control Panel and/or Print Wizard software.
What is a sewing machine?
How to solder
Take apart just about any electronic device and you’ll see components attached using solder. Solder is a metal alloy that melts at a relatively low temperature. Soldering is the process of joining two or more electronic parts together by applying melted solder around them. When the melted solder cools, it forms a strong mechanical and electrical bond between the parts.
All about glue
There are many different types of adhesives in the lab! Use the chart below to help you choose the best one for your project.
Which one to use when? Factors to consider:
- Materials to be bonded: porous, non-porous, etc?
- Does the project need to be archival?
- Rigid vs flexible materials?
- What’s the environment? Indoor / outdoor, water resistance, heat resistance?
- Price constraints
- Time constraints
- Environmental issues (fumes, cleanup, etc)
- Dry time
Good habits for a successful gluing experience:
- READ DIRECTIONS
- Pre-sand or rough up, esp. if gluing painted surfaces
- Clean surfaces – remove dust, grease, etc
- Metal / plastic: clean with 99% alcohol
- Wood / paper / fabric: remove dust with vacuum or canned air
- Clean hands
- Think about how you are going to do the glue-up before you start. Once the glue goes on, your working time is limited!
- Clamp / immobilize until glue dries: rubber bands, tape, surgical tubing, physical therapy bands, quick-clamps, dead weights
- Remove excess glue afterward using tools / solvents
- Health & safety: ventilation, how not to glue your fingers together
Good tools to have around:
- Clamps, clothespins, rubber bands, strong tape, etc for holding glue joints together
- Heavy things: gym weights, bricks, cinder blocks
- Masking tape
- Drop cloths / newspaper
- Respirator if using spray products. USE THE RIGHT KIND.
- Sanding blocks, sandpaper, power sander
- Wire brush
- Rags (old cotton T-shirts)
- The appropriate solvent: petroleum-based, acetone, alcohol, or water
- Scrapers, knives, razor blades
- Cheap brushes or craft sticks for applying glue
- Canned air for removing dust
Safety concerns?
Search the name of the adhesive online plus MSDS (for “Manufacturer’s Safety Data Sheet”) or talk to Fimbel staff