Categories
Presenter Instructions

Finding Your Section of the Symposium Page

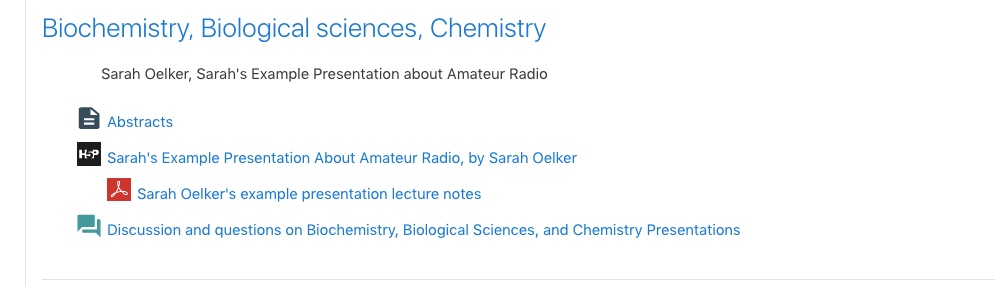
Presenters in Senior Symposium have been added as teachers to the Senior Symposium Spring 2020 Moodle course. Log in to Moodle as you usually would, and look for this course in your Dashboard. Once you’ve gotten to the course front page, scroll down until you find the section that includes your major. This is where you will be uploading your materials.

You may want to find your spot now, just so that you can ask us if you have any trouble, and then come back once you have your recording and lecture notes ready for upload.

You’ll be uploading materials by adding activities and resources (the basic building blocks of a Moodle course) to this section. You’ll do this by turning editing on with the green button with the icon of a pencil, in the top left of your Moodle window. Then click on the “+ Add an activity or resource” link in your section. See our instructions on adding an H5P activity for the next steps.

Questions? Email Digital Pedagogy:

Categories
Presenter Instructions

Using Zoom to Record Your Presentation

This year, all Senior Symposium students are asked to record a video version of their presentation. This is easy to achieve via Zoom. Watch the video below for a breakdown of the steps.

That video of your presentation should be recorded to the local computer, not to the cloud. If you have questions about this distinction, please see the following resource from Zoom:

If you have technical questions about this stage, please e-mail Digital Pedagogy:

Categories
Presenter Instructions

Uploading an Unlisted Video to YouTube

Create an account and log in to Youtube using your MHC login.  

Click the circular account icon in upper right hand corner (this will have your MHC Google Acct. Image).  When you click on it, there will be a drop down menu, click the top choice, “Your Channel.”

If you’ve never uploaded a video to this channel before, in the center of the main page of “Your Channel” click on the “Upload Video” button.

(If you have uploaded previous videos, this button will be under the video camera icon with the plus sign on it, in the upper right of your screen.)

In the next window that pops up, you can either drag and drop the file you want to upload, or hit the “Select File” button.  A finder window will pop up, find the video you want to upload and hit “Open.”

Fill in the title and description of your video.  You must also choose your age restriction. Hit “Next” when done.

The next window allows you to add an End Screen or cards.  These are not necessary but can allow you to set links within your video or at the end.  Hit “Next.”

This final window allows you to set your video to Unlisted.  Unlisted means that only people who have the direct link to this video can view it.  Select Unlisted.

You can also set a release date if you don’t want to release the video immediately.  Next hit “Save.”

One last window will come up that allows you to copy the URL of the video so you can embed it in Moodle.

Need assistance? Email Digital Pedagogy:

Categories
Presenter Instructions

If YouTube is Blocked in Your Country: Upload Video Directly to Moodle

If you have the ability to access YouTube, we encourage you to follow our instructions for uploading your presentation as an unlisted YouTube video, and then create your H5P interactive video from the YouTube URL. We realize that some countries block YouTube, so if you cannot get to YouTube, you can use these steps instead.

Important note: you will need to first make sure that your video is under 100 megabytes in size, because Moodle does not allow files over 100MB to be uploaded. Your Zoom recording is likely to already be under 100 MB, but you should look at the file information on your computer and make certain that this is true.

Follow the instructions for making an H5P activity, but at the step where you pick a method to add your video, choose “Upload” and select your recording file from your computer. Allow it the time to finish uploading. Then finish configuring the H5P activity as directed, and click Save and Return to Course.

Categories
Presenter Instructions

Making an H5P Activity for Your Presentation

These instructions will help you add an H5P activity, and the “interactive video” type of content within that activity, to Moodle to contain your presentation video. Once you have your presentation recording ready, use these steps to get it into Moodle. Look at the example below to see how Sarah’s example presentation and lecture notes appear in a section.

Before you follow these steps, be sure you have your recording ready and know where the file is on your device. Then you can either upload this recording to Youtube as an unlisted video, OR you can directly upload to Moodle. A direct upload to Moodle should be possible even if you are a presenter who has returned to China or another internet-restricted country. It’s also the most easily viewable by audience members in those countries. It’s up to you to decide which method works best for you.

Log in to moodle.mtholyoke.edu and go to Senior Symposium Spring 2020.

Find the the section of the course site where you are listed as a presenter. (Don’t see yourself? email digitalpedagogy-g@mtholyoke.edu for help.)

Click the green button in the upper left of the Moodle screen to turn on editing.

Click on “Add an activity or resource” and in the popup, choose the activity that says “Interactive content” and has the H5P logo.

From there, follow the instructions on this tutorial: H5P.org | Tutorial: Interactive Video. Note that H5P activities can host MANY kinds of content and the “Interactive Video” type of content is the one you should use. You will have the option of either inserting link to your unlisted YouTube video, or uploading a video (of 100MB or smaller size) directly to moodle if YouTube is blocked where you are.

Do you have to include interactions in your video? Nope! You’re welcome to explore that if you like, but the “Interactive Video” kind of container is just a convenient way to make your recording available in Moodle.

Categories
Presenter Instructions

Upload Lecture Notes as a Word, PDF or RTF File

Your lecture notes should provide some kind of text-based accompaniment to your recorded presentation. This could be an outline you used when planning your talk, notes you used when speaking, or something along those lines.

Once you’ve decided what will be in your lecture notes, and collected them in a document, save that document as one of the following types:

  • a Microsoft Word document
  • an RTF file, which is a generic word processor file available as an export from Microsoft Word, Google Docs, and other word processors
  • a PDF

Enter the Senior Symposium Spring 2020 course in Moodle, and find your section. Then click the green button with the pencil icon, in the upper left, to turn on editing. Once editing is on, you will see more options. Click the “+ Add an activity or resource” link at the bottom of your section, and choose the File resource type in the popup.

On the next page, give your file a name to display on the Moodle course page, something like “Oelker Presentation Notes” that will make sense to your viewers. Then you can upload the file.

Click “Save and return to course” to save your file.

Use the four way arrow icon to drag your file just underneath your presentation.

If you need to, edit the displayed title by clicking on the pencil icon beside it.

Indent your file underneath your presentation by clicking Edit to the right of the displayed title and clicking “Move right.” But don’t worry; you just need to upload your materials, we’ll clean everything up before the Symposium course opens! Here’s an example of what we will make each section look like (but imagine your presentations and notes in place of Sarah’s examples!)